![]()
Download Article
![]()
Download Article
The V-neckline is a classic for a reason. Blouses, dresses, and T-shirts all look great with this simple neckline which flatters any figure. If you’re sewing a garment that needs a little extra reinforcing, sew facing along the neckline. This keeps the V-neck from sagging or stretching. For a quick neckline that has an overlapping V-shaped collar, create a band of fabric that you sew into the neckline.
-

1
Cut facing using your garment’s pattern. Cut out the shirt or dress pattern piece for the facing and lay it on your facing material. Pin it in place and cut out the facing. The facing prevents the V-neckline from sagging and it gives the edges of the neckline support.[1]
- If your facing pattern is in 2 pieces, sew them together to make a single facing piece.
- Keep in mind that you’ll also need to have your garment pieces assembled at the shoulders. This makes it easier to sew the facing to the neckline.
-
2
Make stay stitches around the garment’s neckline to stabilize the fabric. Set your sewing machine to make very short, straight stitches. Turn your garment inside out and sew around the front and back of the neckline. Leave a 1⁄2 inch (1.3 cm) seam allowance as you sew.[2]
- The stay stitches are optional, but they support the neckline so it doesn’t stretch as you sew.
- Although you can sew the stay stitches by hand, sew the rest of the neckline with your machine so the stitches are sturdy.
Tip: To make it easier to sew around the sharp point of the V, stop sewing when you reach the bottom point. Raise your presser foot and turn the fabric 45-degrees. Then, lower your presser foot and keep sewing around the neckline.
Advertisement
-
3
Lay the facing on the garment so the right sides touch and pin them in place. Flip your garment so the pattern faces out and lay it flat. Place the facing on the garment so the wrong side faces up. Check the raw edges and adjust them so they line up with the raw edges of the garment. Then, insert sewing pins to prevent the fabric from sliding around.[3]
- Match the shoulder seams as you pin along the back of the neckline.
-
4
Sew the facing to the neckline using short, straight stitches. There’s no need to adjust your stitch length from the small ones you already set. Just start sewing from the bottom point of the V around the entire neckline. Leave a 1⁄2 inch (1.3 cm) or 5⁄8 inch (1.6 cm) seam allowance, depending on what your pattern specifies.[4]
-
5
Trim triangular notches along the seam allowance to help the neckline lay flat. The facing can make your V-neck bulky or bunched up unless you trim it. Take a sharp pair of scissors and carefully cut a triangular notch about every 1 inch (2.5 cm) along the seam line. Then, trim as much excess fabric as you can from the point of the V.[5]
- It’s really important that you don’t cut into the stitches or your neckline will fray.
-
6
Understitch around the neckline to keep the facing in place. Unfold the garment and facing material so the pattern side faces up. Arrange the seam allowance so it lays under the facing side and slowly sew straight stitches along the edge of the facing.[6]
- Try to sew close to the seam line, which helps the V-neck lay smooth.
-
7
Fold the facing under and sew a topstitch along the edge of the neckline. Once you’ve finished understitching, tuck the facing under the garment. Take the garment to your sewing machine and make small, straight stitches along the top edge of the neckline. Since these stitches are visible, this line is called a topstitch. When you reach the end, make a few backstitches and cut the thread.[7]
- To make your V-neckline lay smooth, you can iron it flat. Check the care instructions for your fabric so you know which setting to use on your iron.

Advertisement
-
1
Sew the shoulder seams of your garment piece together. Stack the front and back pieces of your garment so the pattern-sides touch. Line up the edges and then sew across the shoulder seams so you have 1 garment piece.[8]
- Follow your pattern’s seam allowance recommendation for the shoulders.
-
2
Stay stitch the bottom of the V and snip the bottom point. Take the garment to the sewing machine and keep the fabric wrong-side out. Sew very short, straight stitches 1 inch (2.5 cm) from the bottom point of the V along the seam allowance line. Sew up 1 inch (2.5 cm) from the point. Then, use scissors to snip into the point of the V.[9]
- Sewing stay stitches in a V supports the neckline and prevents it from stretching or sagging.
- Cutting a slit into the point of the V makes it easier to pull and sew the V-neckline.
Tip: Ensure that you don’t cut through the stitches you just made. If you accidentally do, the seam could unravel.
-
3
Cut a strip of fabric for the neckband and fold it in half lengthwise. Follow your pattern measurements for the neckband or measure the neckline on your garment and subtract 1⁄2 inch (1.3 cm) to find the measurement. Then, cut a strip of fabric that’s as long as your measurement and fold it in half lengthwise so the pattern faces out.[10]
- You can make your neckband as wide or narrow as you like.
- To make it easier to sew, iron the neckband flat.
-
4
Wrap the neckband piece to overlap the ends and pin it in place. Press 1 end of the folded neckband down and hold the opposite end with your other hand. Wrap it around to make a loop so the raw edges face out. Then, overlap the ends so the edges line up and push a sewing pin through the fabric.[11]
-
5
Sew straight stitches in a V-shape along the folded edge of the neckband. Make short stay stitches about 1⁄2 inch (1.3 cm) from the raw edge of the neckband. Just stitch a V-shape that’s about 1 inch (2.5 cm) long on each side.[12]
- The stay stitches keep the neckband in place so it’s easier to position it around your garment’s neckline.
-
6
Pin the right side of the collar to the right side of the garment neckline. Lay your garment flat so the pattern faces up and push a sewing pin through the bottom point of the neckband’s stay stitches. Push the pin through the bottom point of the garment’s V so you can swivel the neckband around. Line up the raw edges of the neckband with the raw edge of the garment and insert a pin about every 1 to 2 inches (2.5 to 5.1 cm).[13]
- You’ll probably need to stretch the neckband slightly as you pin it to the garment.
-
7
Straight stitch around the neckband. Start sewing at the bottom point of the V and use a straight to sew up and around the neckband. Leave a 1⁄4 inch (0.64 cm) seam allowance as you sew. Continue to sew until you reach the bottom of the V where you started and fold your new V-neck back so it’s flat. Make a few backstitches when you reach the end and cut the thread.[14]
- If you’re sewing stretchy fabric, use a zigzag stitch instead of a straight stitch. This lets the neckline stretch and pull back into place.
Advertisement
Ask a Question
200 characters left
Include your email address to get a message when this question is answered.
Submit
Advertisement
-
Always use thread that matches your garment.
Thanks for submitting a tip for review!
Advertisement
-
Avoid sewing over your sewing pins because this can damage the needle of your machine.
Advertisement
Things You’ll Need
- Pattern
- Garment pieces
- Facing material
- Scissors
- Sewing pins
- Sewing machine
- Garment
- Fabric
- Sewing pins
- Scissors
- Sewing machine
References
About This Article
Thanks to all authors for creating a page that has been read 20,036 times.
Did this article help you?
![]()
Download Article
![]()
Download Article
The V-neckline is a classic for a reason. Blouses, dresses, and T-shirts all look great with this simple neckline which flatters any figure. If you’re sewing a garment that needs a little extra reinforcing, sew facing along the neckline. This keeps the V-neck from sagging or stretching. For a quick neckline that has an overlapping V-shaped collar, create a band of fabric that you sew into the neckline.
-
1
Cut facing using your garment’s pattern. Cut out the shirt or dress pattern piece for the facing and lay it on your facing material. Pin it in place and cut out the facing. The facing prevents the V-neckline from sagging and it gives the edges of the neckline support.[1]
- If your facing pattern is in 2 pieces, sew them together to make a single facing piece.
- Keep in mind that you’ll also need to have your garment pieces assembled at the shoulders. This makes it easier to sew the facing to the neckline.
-
2
Make stay stitches around the garment’s neckline to stabilize the fabric. Set your sewing machine to make very short, straight stitches. Turn your garment inside out and sew around the front and back of the neckline. Leave a 1⁄2 inch (1.3 cm) seam allowance as you sew.[2]
- The stay stitches are optional, but they support the neckline so it doesn’t stretch as you sew.
- Although you can sew the stay stitches by hand, sew the rest of the neckline with your machine so the stitches are sturdy.
Tip: To make it easier to sew around the sharp point of the V, stop sewing when you reach the bottom point. Raise your presser foot and turn the fabric 45-degrees. Then, lower your presser foot and keep sewing around the neckline.
Advertisement
-
3
Lay the facing on the garment so the right sides touch and pin them in place. Flip your garment so the pattern faces out and lay it flat. Place the facing on the garment so the wrong side faces up. Check the raw edges and adjust them so they line up with the raw edges of the garment. Then, insert sewing pins to prevent the fabric from sliding around.[3]
- Match the shoulder seams as you pin along the back of the neckline.
-
4
Sew the facing to the neckline using short, straight stitches. There’s no need to adjust your stitch length from the small ones you already set. Just start sewing from the bottom point of the V around the entire neckline. Leave a 1⁄2 inch (1.3 cm) or 5⁄8 inch (1.6 cm) seam allowance, depending on what your pattern specifies.[4]
-
5
Trim triangular notches along the seam allowance to help the neckline lay flat. The facing can make your V-neck bulky or bunched up unless you trim it. Take a sharp pair of scissors and carefully cut a triangular notch about every 1 inch (2.5 cm) along the seam line. Then, trim as much excess fabric as you can from the point of the V.[5]
- It’s really important that you don’t cut into the stitches or your neckline will fray.
-
6
Understitch around the neckline to keep the facing in place. Unfold the garment and facing material so the pattern side faces up. Arrange the seam allowance so it lays under the facing side and slowly sew straight stitches along the edge of the facing.[6]
- Try to sew close to the seam line, which helps the V-neck lay smooth.
-
7
Fold the facing under and sew a topstitch along the edge of the neckline. Once you’ve finished understitching, tuck the facing under the garment. Take the garment to your sewing machine and make small, straight stitches along the top edge of the neckline. Since these stitches are visible, this line is called a topstitch. When you reach the end, make a few backstitches and cut the thread.[7]
- To make your V-neckline lay smooth, you can iron it flat. Check the care instructions for your fabric so you know which setting to use on your iron.
Advertisement
-
1
Sew the shoulder seams of your garment piece together. Stack the front and back pieces of your garment so the pattern-sides touch. Line up the edges and then sew across the shoulder seams so you have 1 garment piece.[8]
- Follow your pattern’s seam allowance recommendation for the shoulders.
-
2
Stay stitch the bottom of the V and snip the bottom point. Take the garment to the sewing machine and keep the fabric wrong-side out. Sew very short, straight stitches 1 inch (2.5 cm) from the bottom point of the V along the seam allowance line. Sew up 1 inch (2.5 cm) from the point. Then, use scissors to snip into the point of the V.[9]
- Sewing stay stitches in a V supports the neckline and prevents it from stretching or sagging.
- Cutting a slit into the point of the V makes it easier to pull and sew the V-neckline.
Tip: Ensure that you don’t cut through the stitches you just made. If you accidentally do, the seam could unravel.
-
3
Cut a strip of fabric for the neckband and fold it in half lengthwise. Follow your pattern measurements for the neckband or measure the neckline on your garment and subtract 1⁄2 inch (1.3 cm) to find the measurement. Then, cut a strip of fabric that’s as long as your measurement and fold it in half lengthwise so the pattern faces out.[10]
- You can make your neckband as wide or narrow as you like.
- To make it easier to sew, iron the neckband flat.
-
4
Wrap the neckband piece to overlap the ends and pin it in place. Press 1 end of the folded neckband down and hold the opposite end with your other hand. Wrap it around to make a loop so the raw edges face out. Then, overlap the ends so the edges line up and push a sewing pin through the fabric.[11]
-
5
Sew straight stitches in a V-shape along the folded edge of the neckband. Make short stay stitches about 1⁄2 inch (1.3 cm) from the raw edge of the neckband. Just stitch a V-shape that’s about 1 inch (2.5 cm) long on each side.[12]
- The stay stitches keep the neckband in place so it’s easier to position it around your garment’s neckline.
-
6
Pin the right side of the collar to the right side of the garment neckline. Lay your garment flat so the pattern faces up and push a sewing pin through the bottom point of the neckband’s stay stitches. Push the pin through the bottom point of the garment’s V so you can swivel the neckband around. Line up the raw edges of the neckband with the raw edge of the garment and insert a pin about every 1 to 2 inches (2.5 to 5.1 cm).[13]
- You’ll probably need to stretch the neckband slightly as you pin it to the garment.
-
7
Straight stitch around the neckband. Start sewing at the bottom point of the V and use a straight to sew up and around the neckband. Leave a 1⁄4 inch (0.64 cm) seam allowance as you sew. Continue to sew until you reach the bottom of the V where you started and fold your new V-neck back so it’s flat. Make a few backstitches when you reach the end and cut the thread.[14]
- If you’re sewing stretchy fabric, use a zigzag stitch instead of a straight stitch. This lets the neckline stretch and pull back into place.
Advertisement
Ask a Question
200 characters left
Include your email address to get a message when this question is answered.
Submit
Advertisement
-
Always use thread that matches your garment.
Thanks for submitting a tip for review!
Advertisement
-
Avoid sewing over your sewing pins because this can damage the needle of your machine.
Advertisement
Things You’ll Need
- Pattern
- Garment pieces
- Facing material
- Scissors
- Sewing pins
- Sewing machine
- Garment
- Fabric
- Sewing pins
- Scissors
- Sewing machine
References
About This Article
Thanks to all authors for creating a page that has been read 20,036 times.
Did this article help you?
Introduction: Turning a Crew Neck Into a V-Neck
I have a lot of t-shirts. A lot. Not nearly as many as my husband does, but it’s still a lot. And I wear almost none of them. It took a while for me to realize it, but the reason I don’t wear these t-shirts is primarily because I don’t like crew necks. They’re uncomfortable and I don’t think they look good on me. So after some thought, I started looking for ways to make these t-shirts wearable. One way is to turn crew necks into v-necks (which I typically wear).
The first time doing this is tricky, but once you get through it, the rest are so much easier.
Step 1: BoM
T-Shirt
Sewing machine
Pins, thread, scissors
Seam ripper
Rotary cutters, matt,
Rulers
Step 2: The T-Shirt
Sadly, not all images printed on t-shirts are printed in the right place. To successfully turn your crew neck tee into a v-neck, you need a couple of inches from the center of the crew neck line to the image. The Halloween Instructables t-shirt I won a few years ago is too high up for me to be able to change the collar without cutting into the logo. Which makes me sad because I worked really hard to get that shirt and I never wear it.
Try the t-shirt on, get an idea where the image starts and how low you can make your v-neck. Compare it to other v-necks you have. Use a couple pins to mark off the lowest the v can go.
Step 3: Crew Neck
This part is a bit tedious because it takes some time and you want a useable collar, so you can’t just rip it off the shirt. Use your seam ripper to detach the front collar. Stop when you get the shoulders.
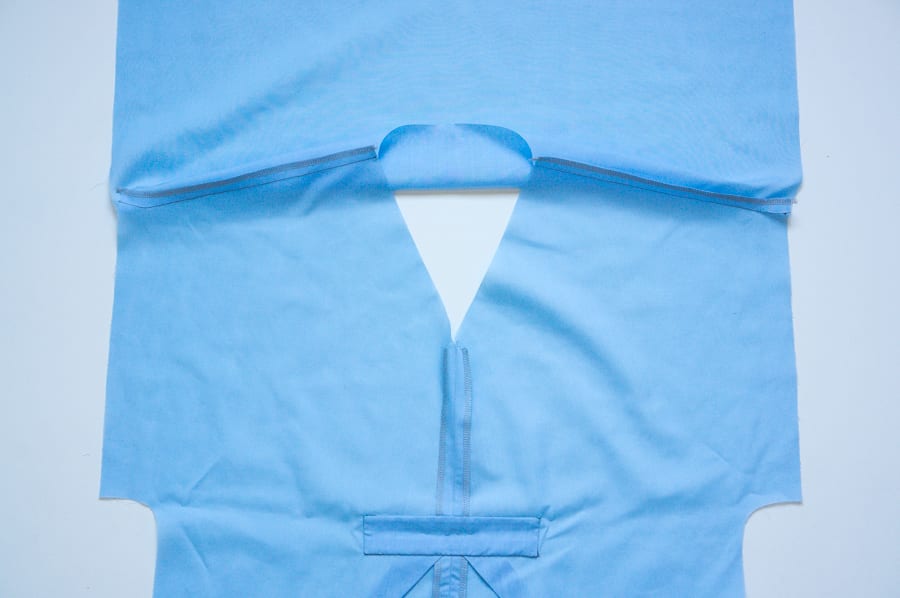
Step 4: Fold the Front
Fold the shirt length wise down the center towards the back. I hope that makes sense. You want the front of the shirt to be separated from the back of the shirt so that when you cut, you’re only cutting front.
Step 5: Measure Twice
Measure twice, cut once. You only want to cut about 2″ off the front to make your V so that you have enough original collar fabric to make the new v-neck. If you cut deeper than 2″, you may need more fabric (which can be constructed out of what you cut off).
Measure 2″ down the center of the shirt and pin it. Use a larger ruler to measure diagonally and make your cut starting at the shoulder seams.
Step 6: The Original Collar
Give the collar a couple of stretches. This is one time when it’s really okay to have a loose collar, it only helps you in creating your v-neck.
Find the center of the collar and cut it.
Step 7: Pin
Starting at a shoulder, begin pinning the collar straps to the right side of the shirt, make sure the raw edges are facing inside.
Be careful not to stretch the collar or the shirt as you pin it, especially if you’re working with a stretchy fabric.
*Note: you may find putting the pins in with the tip facing towards the neck to be easier to manage when sewing. I realized this a bit too late and had to repin.
Step 8: Sew!
Now it’s time to set up your machine. Thread as directed with the closest matching colors you have. While I have black in 4 different thicknesses, I do not have grey/gray. So I’m using black and a blue bobbin that was already set up.
Sew down one edge, leaving a 1/4″ seam allowance if you can. Try to sew slowly and without stretching your fabric. Stop about 1″ from the V. Do the same for the other side.
Step 9: The V
It took me a while to be able to visualize how the V is supposed to look and how to make that happen. Ultimately I ended up pinning the pieces (after cutting one end a bit too short) and then hand stitching the two ends together.
Pin the ends so that they are folded back on themselves, but also overlapping each other.
Backstitch the raw edges. I started my backstitch where the machine stitches left off on the left bottom collar. I tried to keep my stitches small because I find it easier to also keep them straight that way. I chose the backstitch because it’s a strong and flexible stitch and should a stitch break later, the whole collar won’t unravel. Once the left side was almost to the V, I switched and backstitched down the right side collar.
Step 10: The V Continued
To stitch the center of the V together, I decided to use the ladder stitch so that the thread wouldn’t be visible.
Step 11: Finishing Touches
Trim off and secure any loose threads, extra fabric etc. I don’t trust my knots so I always put a little fabric-friendly glue on them. Fray-Check is also good to put on raw edges.
If you find any holes along the neck line that need to be re-stitched, make sure you are paying attention to which way the fabric is facing and not stitch the raw edges facing out. Like I did.
You may also want to iron the collar so that it stays flat.
Be the First to Share
Recommendations
Introduction: Turning a Crew Neck Into a V-Neck
I have a lot of t-shirts. A lot. Not nearly as many as my husband does, but it’s still a lot. And I wear almost none of them. It took a while for me to realize it, but the reason I don’t wear these t-shirts is primarily because I don’t like crew necks. They’re uncomfortable and I don’t think they look good on me. So after some thought, I started looking for ways to make these t-shirts wearable. One way is to turn crew necks into v-necks (which I typically wear).
The first time doing this is tricky, but once you get through it, the rest are so much easier.
Step 1: BoM
T-Shirt
Sewing machine
Pins, thread, scissors
Seam ripper
Rotary cutters, matt,
Rulers
Step 2: The T-Shirt
Sadly, not all images printed on t-shirts are printed in the right place. To successfully turn your crew neck tee into a v-neck, you need a couple of inches from the center of the crew neck line to the image. The Halloween Instructables t-shirt I won a few years ago is too high up for me to be able to change the collar without cutting into the logo. Which makes me sad because I worked really hard to get that shirt and I never wear it.
Try the t-shirt on, get an idea where the image starts and how low you can make your v-neck. Compare it to other v-necks you have. Use a couple pins to mark off the lowest the v can go.
Step 3: Crew Neck
This part is a bit tedious because it takes some time and you want a useable collar, so you can’t just rip it off the shirt. Use your seam ripper to detach the front collar. Stop when you get the shoulders.
Step 4: Fold the Front
Fold the shirt length wise down the center towards the back. I hope that makes sense. You want the front of the shirt to be separated from the back of the shirt so that when you cut, you’re only cutting front.
Step 5: Measure Twice
Measure twice, cut once. You only want to cut about 2″ off the front to make your V so that you have enough original collar fabric to make the new v-neck. If you cut deeper than 2″, you may need more fabric (which can be constructed out of what you cut off).
Measure 2″ down the center of the shirt and pin it. Use a larger ruler to measure diagonally and make your cut starting at the shoulder seams.
Step 6: The Original Collar
Give the collar a couple of stretches. This is one time when it’s really okay to have a loose collar, it only helps you in creating your v-neck.
Find the center of the collar and cut it.
Step 7: Pin
Starting at a shoulder, begin pinning the collar straps to the right side of the shirt, make sure the raw edges are facing inside.
Be careful not to stretch the collar or the shirt as you pin it, especially if you’re working with a stretchy fabric.
*Note: you may find putting the pins in with the tip facing towards the neck to be easier to manage when sewing. I realized this a bit too late and had to repin.
Step 8: Sew!
Now it’s time to set up your machine. Thread as directed with the closest matching colors you have. While I have black in 4 different thicknesses, I do not have grey/gray. So I’m using black and a blue bobbin that was already set up.
Sew down one edge, leaving a 1/4″ seam allowance if you can. Try to sew slowly and without stretching your fabric. Stop about 1″ from the V. Do the same for the other side.
Step 9: The V
It took me a while to be able to visualize how the V is supposed to look and how to make that happen. Ultimately I ended up pinning the pieces (after cutting one end a bit too short) and then hand stitching the two ends together.
Pin the ends so that they are folded back on themselves, but also overlapping each other.
Backstitch the raw edges. I started my backstitch where the machine stitches left off on the left bottom collar. I tried to keep my stitches small because I find it easier to also keep them straight that way. I chose the backstitch because it’s a strong and flexible stitch and should a stitch break later, the whole collar won’t unravel. Once the left side was almost to the V, I switched and backstitched down the right side collar.
Step 10: The V Continued
To stitch the center of the V together, I decided to use the ladder stitch so that the thread wouldn’t be visible.
Step 11: Finishing Touches
Trim off and secure any loose threads, extra fabric etc. I don’t trust my knots so I always put a little fabric-friendly glue on them. Fray-Check is also good to put on raw edges.
If you find any holes along the neck line that need to be re-stitched, make sure you are paying attention to which way the fabric is facing and not stitch the raw edges facing out. Like I did.
You may also want to iron the collar so that it stays flat.
Be the First to Share
Recommendations
Мастер-класс по обработке V-образного выреза горловины с кантом

Существует несколько способов обработки выреза горловины на трикотажных изделиях, и один из самых эффектных из них, который часто применяется при пошиве джемперов и футболок — обработка V-образного выреза горловины обтачкой с кантом. Ширина и цвет канта могут быть различными, но наиболее выигрышно выглядят изделия с отделкой горловины контрастным кантом. Как добиться идеальной ширины канта и выполнить обработку профессионально? Ответы на все ваши вопросы — в этом уроке.
-
Мастер-класс по обработке V-образного выреза горловины с кантом
-
Мастер-класс по обработке V-образной горловины на трикотаже
-
Подготовка канта для обтачки
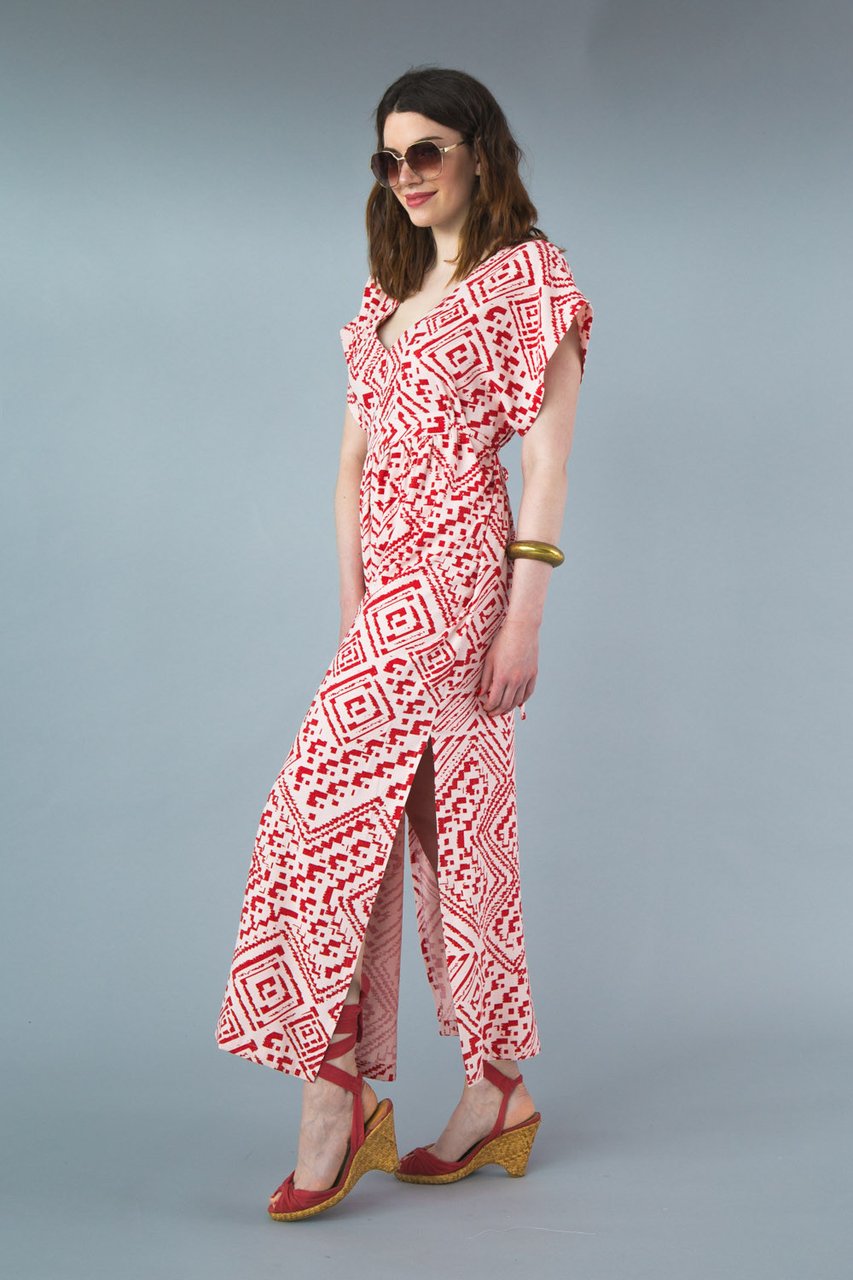
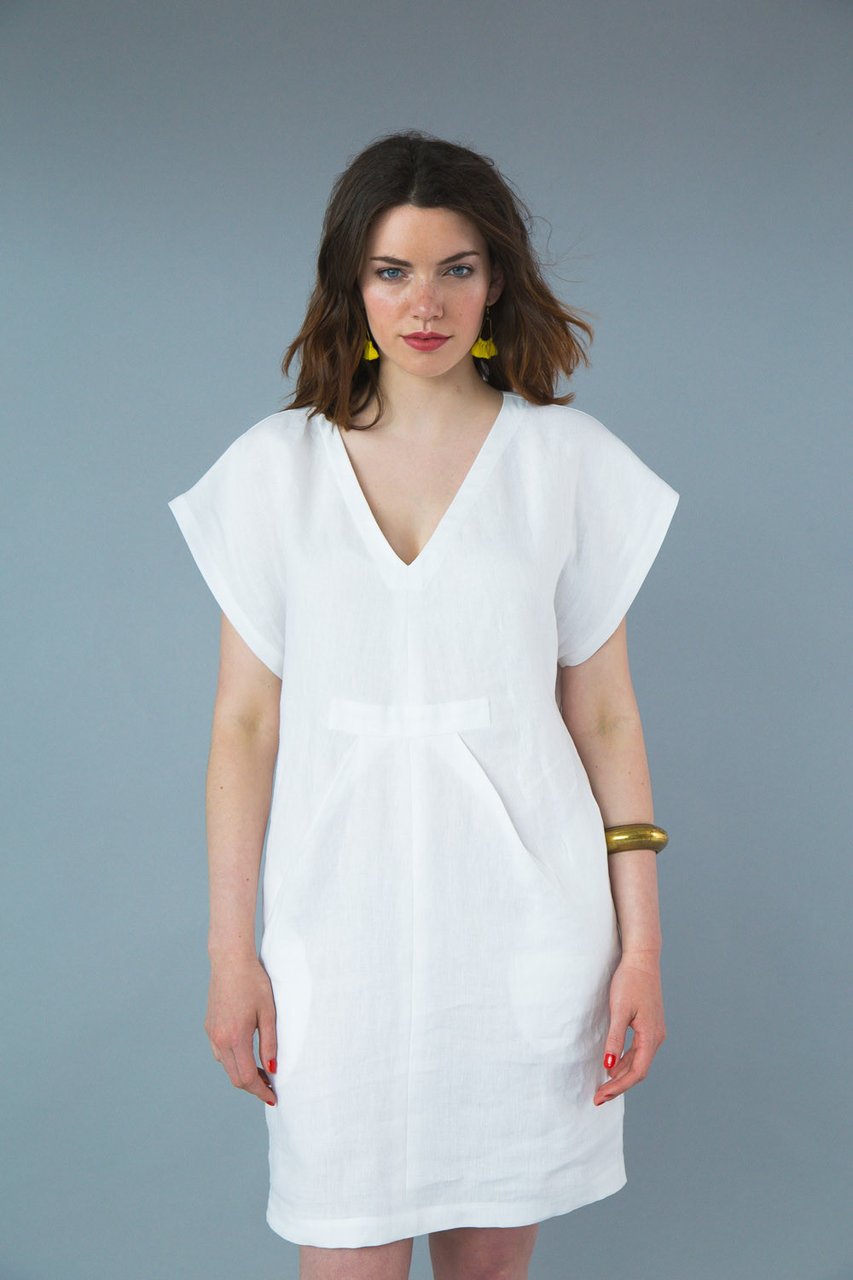
Если вы хотите сшить футболку, представленную на фото самостоятельно, используйте выкройку по ссылке Выкройка футболки
к оглавлению ▴
Мастер-класс по обработке V-образной горловины на трикотаже
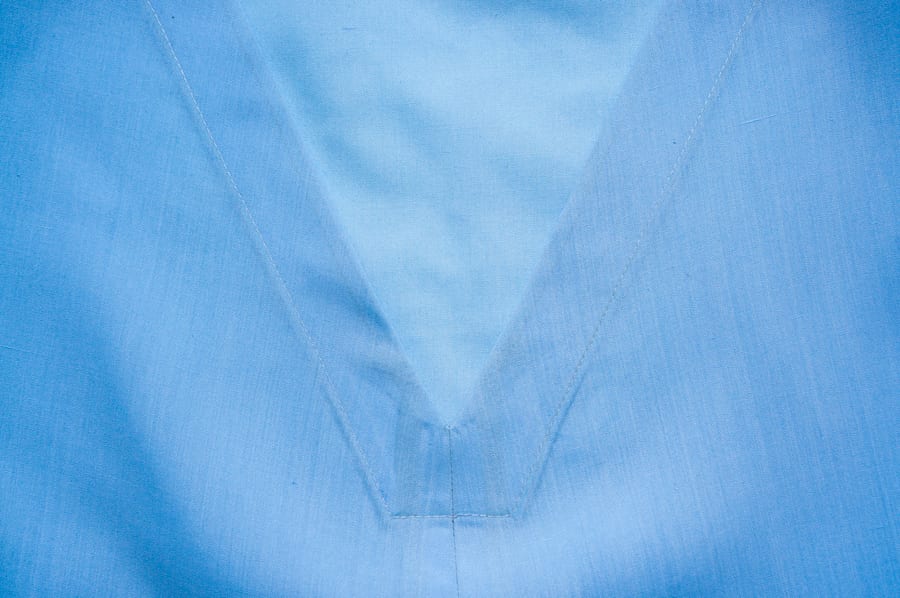
Ширина обтачки в готовом виде в данном примере составляет 3 см, ширина белого канта — около 0,3-0,4 см. Выкроите детали изделия с припусками на швы по 0,5 см, по низу изделия — 2 см. Если вы используете базовую выкройку футболки, смоделируйте V-0бразный вырез горловины глубиной на ваше усмотрение. Не забудьте углубить вырез горловины переда и спинки на ширину обтачки в готовом виде (в данном примере ширина готовой обтачки составляет 3 см).
На изделии стачайте плечевые швы. С изнаночной стороны укрепите нижний уголок выреза изделия с изнаночной стороны кусочком клеевой трикотажной прокладки (рис. 1). Ширина прокладки должна незначительно перекрывать припуски. Подробнее о том какие прокладочные материалы существуют и как их использовать, читайте в уроке Прокладочные материалы и их применение

Рис. 1. Дублирование нижнего уголка выреза горловины переда
Разложите изделие на плоской поверхности и, не растягивая, измерьте полную длину горловины переда и длину горловины спинки (рис. 2).

Рис. 2. Измерение длины выреза горловины изделия
Выкроите обтачку шириной 7,5 см (3 см — ширина обтачки в готовом виде + 1,5 см на припуски) и длиной по длине горловины футболки + 6 см.
ВАЖНО! Выкраивать обтачку нужно строго по уточной нити или в косом направлении под углом 45°(!)
Обтачку перегните пополам лицевой стороной наружу и проутюжьте (рис. 3).

Рис. 3. Подготовка обтачки для обработки V-образного выреза горловины
Чтобы придать краю обтачки более плоскую красивую форму, наложите сразу после утюжки поверх обтачки трамбовку и прижмите. Подержите 8 секунд. Так обработайте всю обтачку (рис. 4).

Рис. 4. Обработка обтачки трамбовкой
Перегните изделие пополам по линиям середины переда и спинки и разложите на плоской поверхности. Обтачку перегните по короткой стороне, сложите пополам и разложите вдоль выреза изделия, придав обтачке форму выреза. Обратите внимание — вдоль выреза горловины спинки на обтачке образуется изогнутый волнистый край (излишек длины), который необходимо сутюжить (рис. 5).

Рис. 5. Обтачка разложена вдоль выреза горловины футболки
Излишек длины вдоль края обтачки необходимо сутюжить, придав обтачке форму выреза горловины. Для этого удерживайте обтачку вдоль заданной формы выреза и аккуратно прижимайте парогенератор, используйте паровой удар (рис. 6). После того, как край сутюжится, зафиксируйте форму обтачки утюгом без пара, и наложите поверх обтачки трамбовку, чтобы убрать излишек влаги.

Рис. 6. Придание обтачке формы при помощи парогенератора
Дайте обтачке полностью остыть на плоской поверхности (рис. 7).

Рис. 7. Форма обтачки для обработки V-образной горловины
При притачивании обтачки к изделию, нижний угол обтачки должен соответствовать форме выреза футболки. Для этого разложите обтачку вдоль горловины футболки по линии притачивания, наложите линейку по линии середины переда и наметьте линию среднего шва на обтачке как показано на рис. 8.

Рис. 8. Разметка линии шва на обтачке
Добавьте на обтачке 1 см припуск на шов и отрежьте излишек обтачки по линейке (рис. 9).

Рис. 9. Срезать излишек обтачки по линейке
Обтачку разложите в один слой, совместите по коротким сторонам лицевой стороной внутрь и стачайте припуски на уголок (рис. 10).

Рис. 10 . Стачивание нижнего края обтачки на уголок
Припуски рассеките на уголок, не доходя 2 мм до шва (рис. 11).

Рис. 11. Рассечь припуски
Разверните обтачку в один слой и с изнаночной стороны разутюжьте припуски на каждой стороне отдельно (рис. 12). Утюжить такие детали удобнее на шовном валике. Как изготовить шовный валик самостоятельно, смотрите в нашем уроке Как изготовить портновские болванки для гладильных работ

Рис. 12. Разутюжить припуски
Перегните обтачку по линии сгиба, совместите средние швы и сколите. Подровняйте стороны обтачки, срезав излишки припусков как показано на рис. 13.

Рис. 13. Срезать излишки припусков на обтачке
Совместите швы обеих слоев и сколите булавкой. Для надежной фиксации нижних припусков обтачки, проложите на расстоянии 0,4 см от края вдоль уголка фиксирующие строчки (рис. 14). Это упростит работу с обтачкой в дальнейшем и не позволит смещаться слоям обтачки относительно друг друга.

Рис. 14. Фиксация нижних припусков обтачки
Удалите булавку и проутюжьте обтачку (рис. 15).

Рис. 15. Проутюжить обтачку
Для придания плоской формы нижнему углу, сразу после утюжки наложите на обтачку трамбовку и подержите 8 сек.

Рис. 16. Придание уголку обтачки плоской формы
к оглавлению ▴
Подготовка канта для обтачки
Из белого трикотажного полотна выкроите по уточной стороне материала (или в косом направлении) кант шириной 1 см и длиной по длине обтачки + небольшая прибавка.
Совет! Если вы планируете выполнять обработку горловины без канта, то переходите сразу к этапу 21 (рис. 21).
Кант перегните пополам и проутюжите, обработайте трамбовкой аналогично тому, как показано на рис. 3-4. Приколите кант к обтачке, совместив края канта с краями обтачки. Концы канта перекрестите (рис. 17).

Рис. 17. Обработка V-образного выреза горловины обтачкой с кантом
Срежьте кант на уголок по обтачке, добавив припуски на швы около 0,5 см с каждой короткой стороны канта. Кант в развернутом виде показан на рис. 18.

Рис. 18. Кант в развернутом виде со срезанными припусками
Не снимая весь кант с обтачки, удалите нижние булавки, чтобы было удобно выполнить строчку. Сложите короткие подрезанные края канта лицевыми сторонами друг к другу и стачайте на уголок (рис. 19).

Рис. 19. Стачать короткие стороны канта на уголок
Припуски на канте рассеките (аналогично обтачке, см. рис. 11 -13) и проутюжьте. Притачайте кант к обтачке вдоль уголка на расстоянии 0,5 см от края (фиксирующие стежки).
Совет для новичков! Притачайте кант к обтачке по всей длине, так легче будет выдержать ширину канта одинаковой вдоль всей горловины.

Рис. 20. Фиксирующие стежкт вдоль угла канта
Припуск горловины переда рассеките на уголок на 0,5 см (рис. 21).

Рис. 21. Припуск горловины рассечь на уголок
Обтачку притачайте к вырезу горловины, начиная об рассечки — сначала одну сторону, затем — от рассечки — другую сторону (рис. 22). Шов выполните со стороны изделия (!). Эти фиксирующие строчки надежно закрепят уголок и не дадут обтачке сместиться при втачивании.

Рис. 22. Притачать обтачку к изделию вдоль нижнего угла
Затем выверните изделие на лицевую сторону, обачку равномерно распределите по горловине, совместите по центру спинки, вколите в горловину (рис. 23).

Рис. 23. Обтачку вколоть в горловину изделия
На оверлоке установите ширину стежка 5-6 мм. Притачайте обтачку к вырезу горловины со стороны обтачки, начинаю от нижнего угла обтачки (рис. 24).
Совет для новичков! Чтобы добиться идеально ровной ширины канта вдоль всей горловины, рекомендуем сначала притачать подготовленную обтачку к изделию на швейной машине прямой строчкой, длиной стежка 4 мм (используйте контрастные нитки, шов выполните со стороны обтачки). Затем притачайте обтачку к изделию как показано на рис. 24 оверлочным швом, ориентируясь на вспомогательную строчку (край оверлочного шва должен совпадать со вспомогательно строчкой). Затем вспомогательный шов можно удалить.

Рис. 24. Притачивание обтачки в V-образную горловину изделия
Вид изделия с изнаночный стороны показан на рис. 25. Почистите изнаночную сторону: концы нитей завяжите и обрежьте, все вспомогательные швы аккуратно удалите.

Рис. 25. Вид V-образной горловины с изнаночной стороны
Вид V-образной горловины футболки с кантом показан на рис. 26. Ширина и цвет канта может варьировать на усмотрение дизайнера.

Рис. 26. Вид V-образной горловины с обтачкой с кантом
Если вы решите декорировать вырез V-образной горловины обтачкой с кантом, то рекомендуем также добавить кант и на манжетах рукавов — это придаст изделию завершенный вид (рис. 27).

Рис. 27. Готовая футболка с V-образным вырезом с кантом
Еще больше оригинальных выкроек и интересных идей для творчества вы найдете на сайте Школа шитья Анастасии Корфиати. Оформите бесплатную подписку и первыми получайте новые уроки!
Смотрите также:
- Выкройки трикотажных изделий
- Мастер-класс по пошиву футболки поло
- Обработка горловины косой бекой на трикотажном джемпере
- Как шить трикотаж
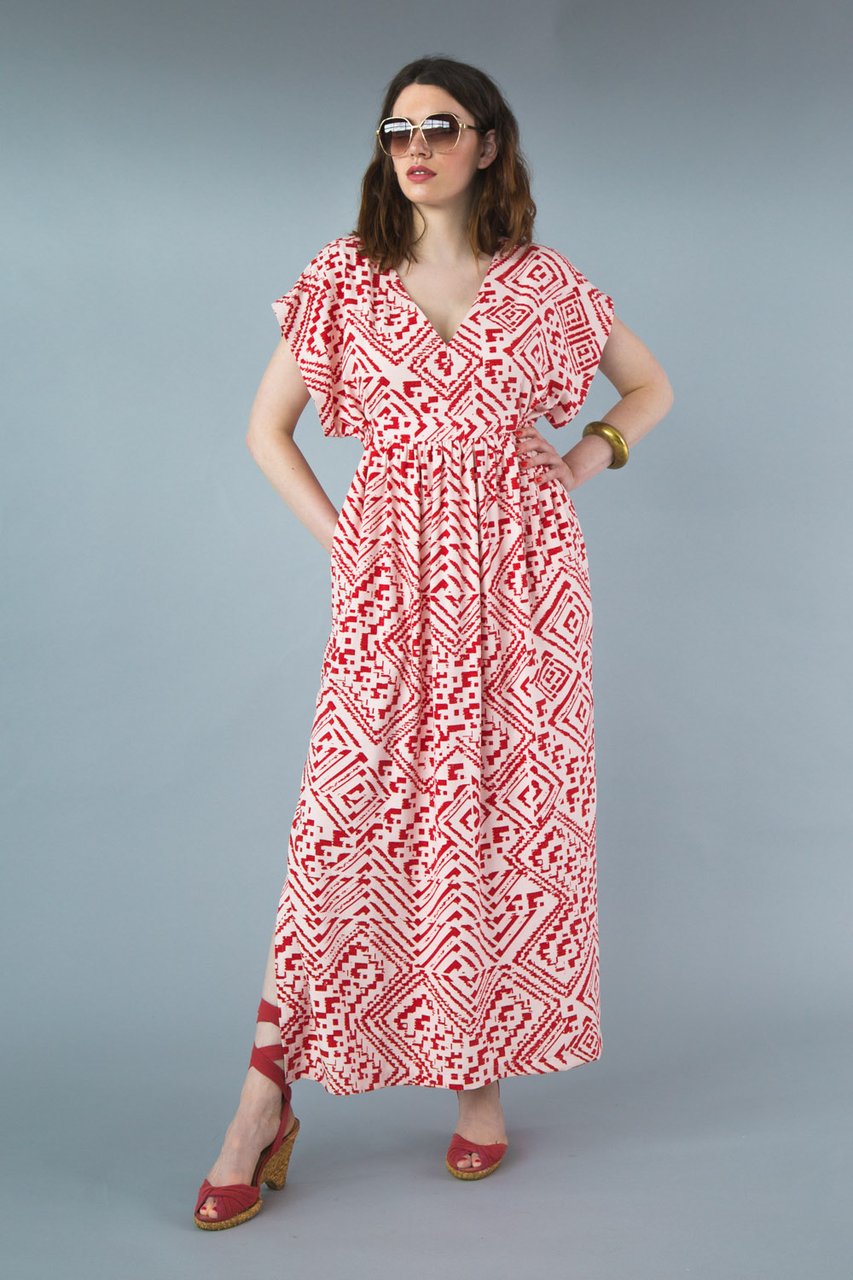
V-образный вырез льстит практически любому лицу и фигуре. Поэтому не удивительно, что многие девушки выбирают именного его. В майке такого фасона лицо выглядит выразительнее, а шея длиннее. Но если у вас есть футболка с обычным вырезом, которая очень нравится вам по цвету и фактуре ткани, просто переделайте её!
Вам понадобится:
- приспособление для распарывания швов
- портновские ножницы
- булавки
- сантиметровая лента
- нитки, подходящие по тону

Шаг 1
При помощи вспарывателя распустите шов, который соединяет горловину майки и резинку. Сзади резинку оставляем пришитой.
Шаг 2
Сложите майку таким образом, чтобы передняя часть горловины была совмещена симметрично.
Шаг 3
Теперь нужно сделать новый вырез. Отрежьте при помощи острых ножниц нужное количество ткани. Если вы планируете использовать старую резинку, вырез не должен опускаться от линии прежнего более, чем на 5 сантиметров. В ином случае, вам придётся купить дополнительную ткань для обработки.
Шаг 4
Разрежьте нижнюю часть оригинальной резинки пополам.

Шаг 5
Теперь немного растяните резинку, прежде чем снова крепить ее к майке.
Шаг 6
Необходимо совместить края резинки и нового среза футболки. Нужно сложить их вместе лицевой стороной внутрь и закрепить булавками. Убедитесь, что получается ровная V-образная форма.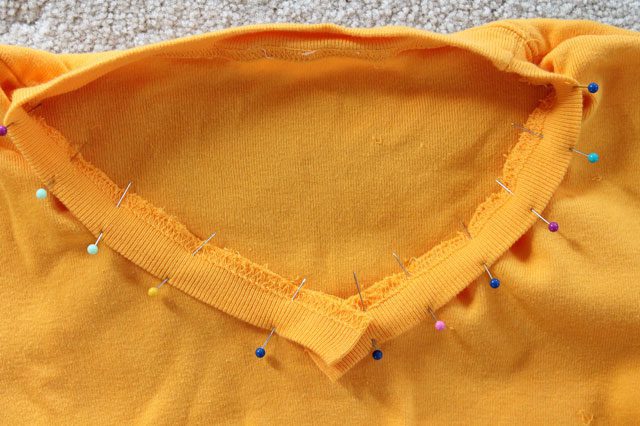
Шаг 7
Теперь прострочите резинку и майку вместе на швейной машинке. Не забывайте удалять булавки, чтобы не сломать иглу.
Шаг 8
Сделайте шов, не доходя 2 см до того места, где заканчивается половина резинки.
Шаг 9
Теперь нужно совместить край воротника и край резинки, сложив их лицевыми сторонами и сколов булавками. Именно вдоль линий, которые намечаются булавками нужно проложить шов.

Шаг 10
Пришейте оставшуюся часть резинки, заходя машинкой на ту линию, что образована булавкой.
Шаг 11
Выверните первую половину. Она должна выглядеть подобным образом.
Шаг 12
Таким же образом пришейте вторую часть резинки.
Шаг 13
Совместите углы резинки и скрепите булавками.
Шаг 14
Проложите шов по V-образному краю. Можете закрепить еще раз весь воротник.

Теперь у вас есть рубашка с красивым вырезом. Она будет смотреться ничуть не менее эффектно, чем майка из магазина.
Сегодня мы рассмотрим, как сделать V-образный вырез горловины на изделии, которое вы шьете. Этот вид декольте самый сложный в обработке. Но, изучив наш мастер-класс, вы непременно справитесь с этой задачей. Также мы познакомим вас с интересными швейными хитростями, которые облегчат работу.
Глубокая V-образный вырез – это настоящее украшение женщины, поскольку он подчеркивает красоту шеи, визуально удлиняет ее. Но если вырез неправильно выполнен, то могут появиться морщины, волнистые линии по краю или растяжение. Надеюсь, этот пост поможет вам создать красивый вырез на платье или блузке, и вы будете с успехом применять наши советы в будущем.
Прежде чем мы начнем делать вырез, оговорим, что передняя и задняя части изделия должны быть сшиты вдоль плечевых швов с припуском 1,5 см. Обрабатываем открытые срезы либо оверлоком, либо зигзагом, либо французским швом.
Заутюживаем швы к спинке.
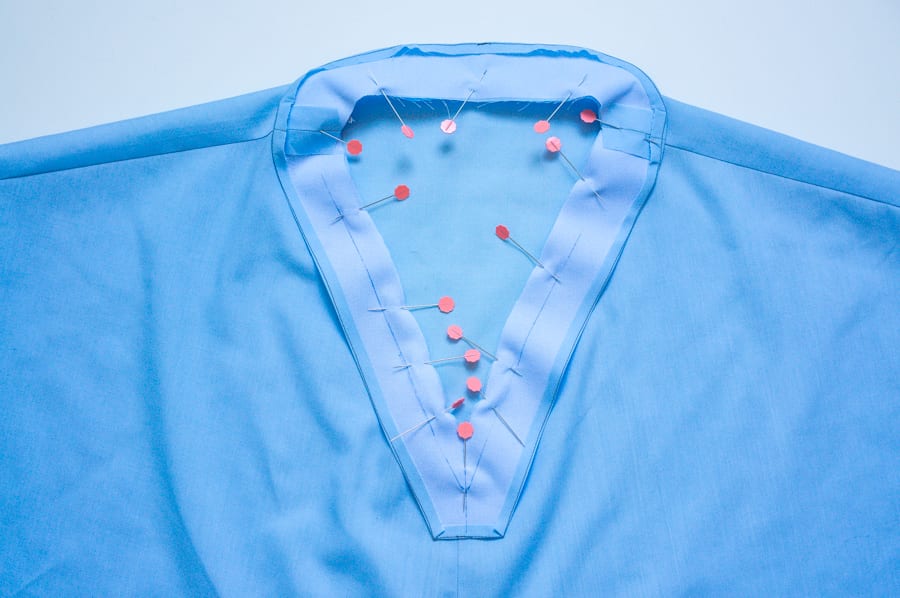
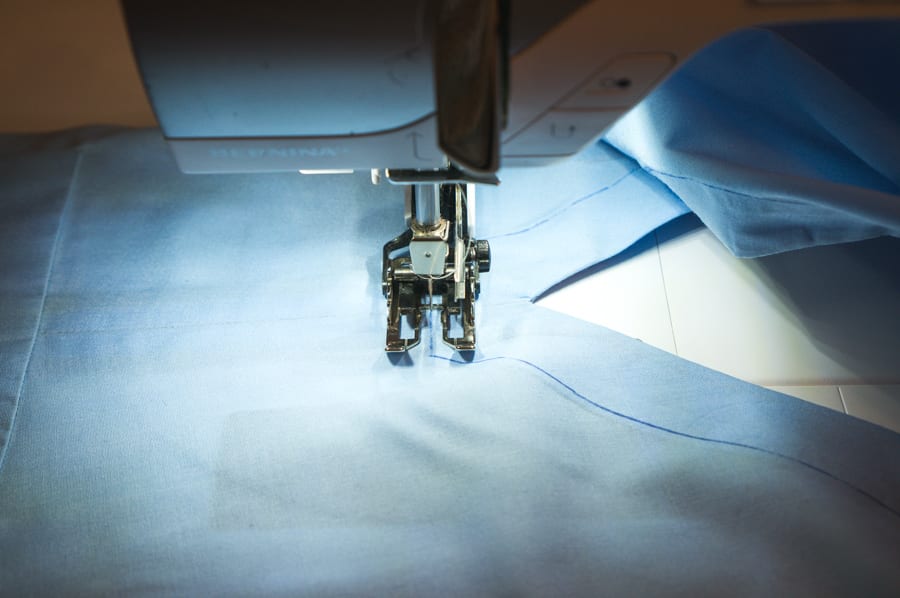
Поскольку V-образная горловина вырезается по косой линии, важно прострочить вдоль выреза горловины, чтоб она не растягивалась. Вам нужно проложить эту закрепляющую строчку в пределах припуска на шов в 1,5 см, чтобы она не была видна, когда будет пришита обтачка.
Одна из сложностей при шитье V-образной горловины состоит в том, чтоб сделать вырез одинаковой длины с обеих сторон. Чтоб избежать разной длины швов я рисую линии с помощью линейки для квилтинга, либо направляющей для припусков и исчезающей ручкой для разметки.
Выровняв припуск на шов (в данном случае 1,3 см, чтоб он не был виден на готовом изделии) вдоль горловины и затем продолжив линию вниз к середине переда, вы обеспечиваете точную линию швов.
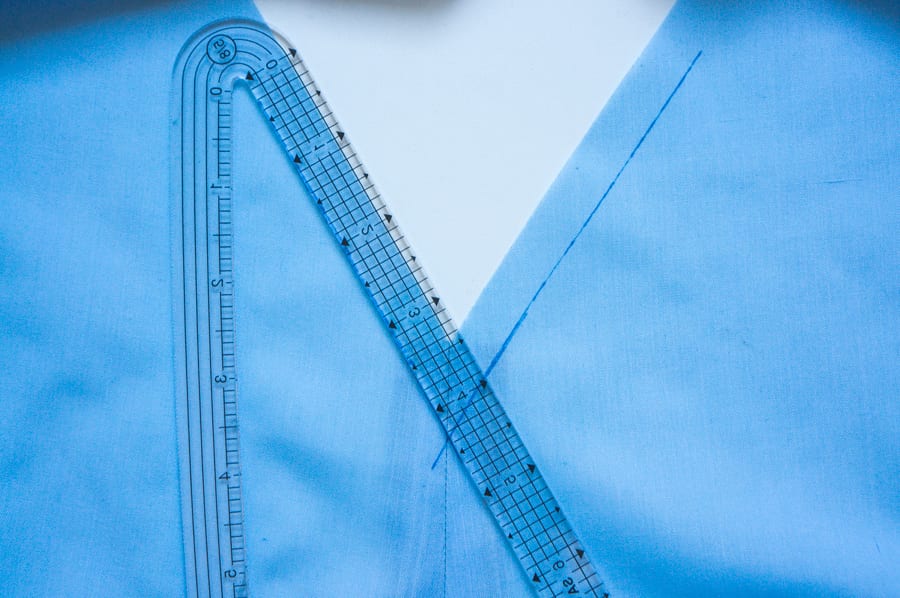
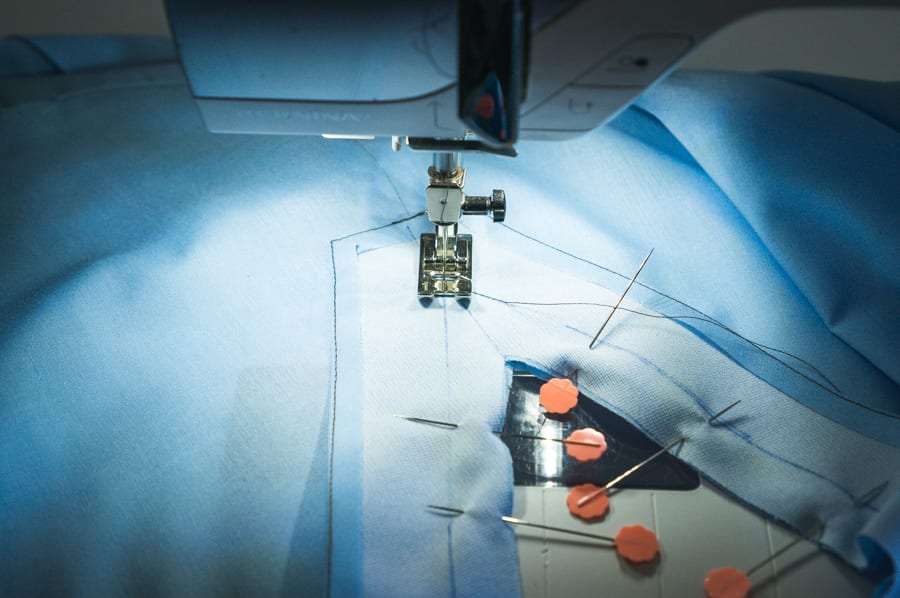
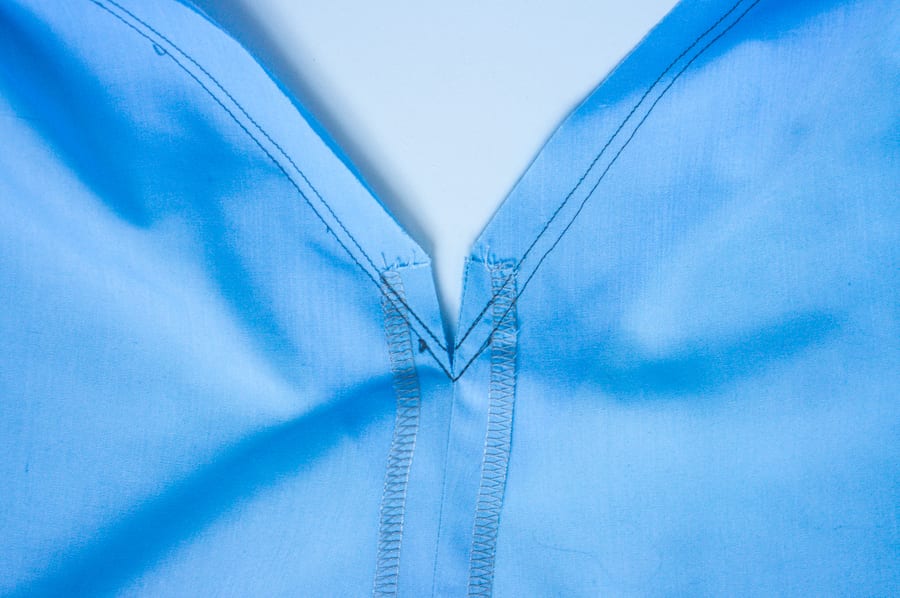
Вместо того, чтобы прошивать одной непрерывной строчкой вокруг всего выреза за один прием, я рекомендую шить каждую сторону выреза отдельно. Установите короткую длину стежка, начните примерно за 2,5 см до самой глубокой части выреза и шейте вниз до нижнего угла. Затем, оставив иглу в шитье, поднимите лапку швейной машинки и поверните изделие, направив лапку в направлении следующего шва. Продолжайте шить, пока не дойдете до середины спинки (красная линия на фото ниже). Затем повторите в обратном порядке, начав в 2,5 см от нижнего угла с другой стороны (салатовая линия на фото ниже).
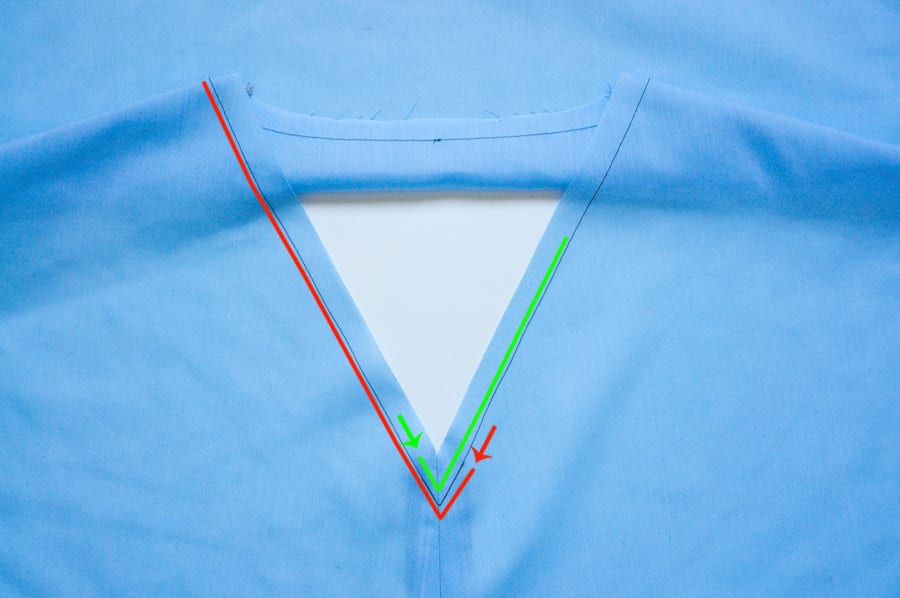
Поскольку ткань не тянется в противоположных направлениях при шитье, это поможет предотвратить возникновение волнистых линий.
Если не получается избежать волнистых линий, можно вшить саржевую ленту. Это должно помочь.
Теперь подготовим обтачку. Передняя и задняя части обтачки должны быть сшиты. Выравниваем эти детали вдоль плечевого шва, складываем лицевыми сторонами друг к другу и сшиваем вместе с припуском на шов 1,5 см, затем припуски разутюживаем. Если какие-то уголки ткани выглядывают наружу, их можно подрезать.
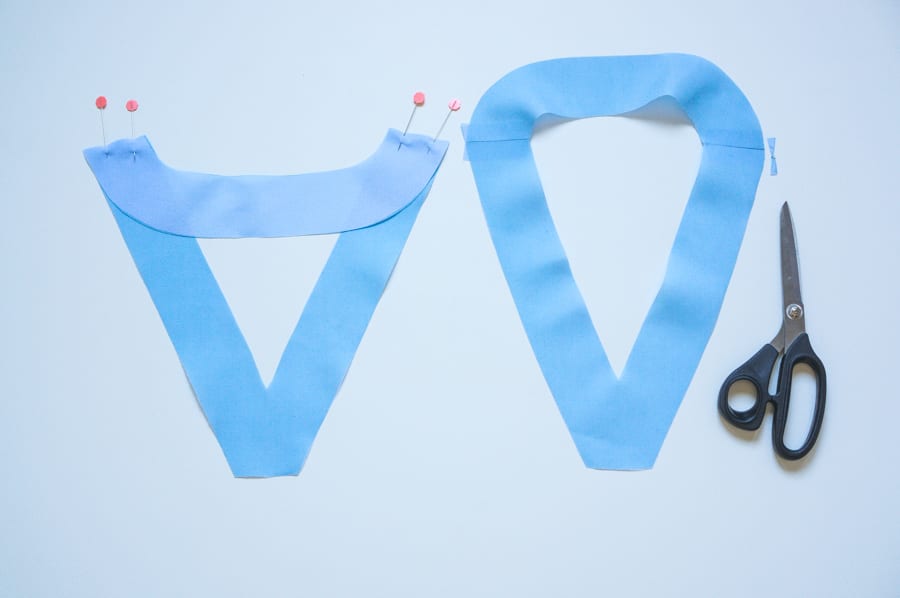
Внешний необработанный край обтачки нуждается в обработке. Вы можете оверлочить край либо заутюжить на 0,5 см и прошить вдоль края так, чтоб необработканный край в готовом изделии был завернут внутрь.
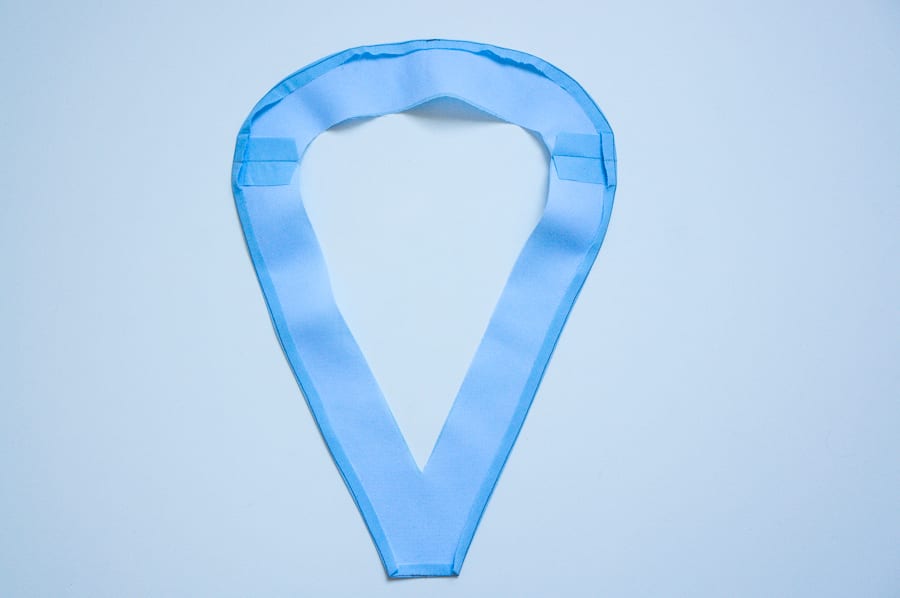
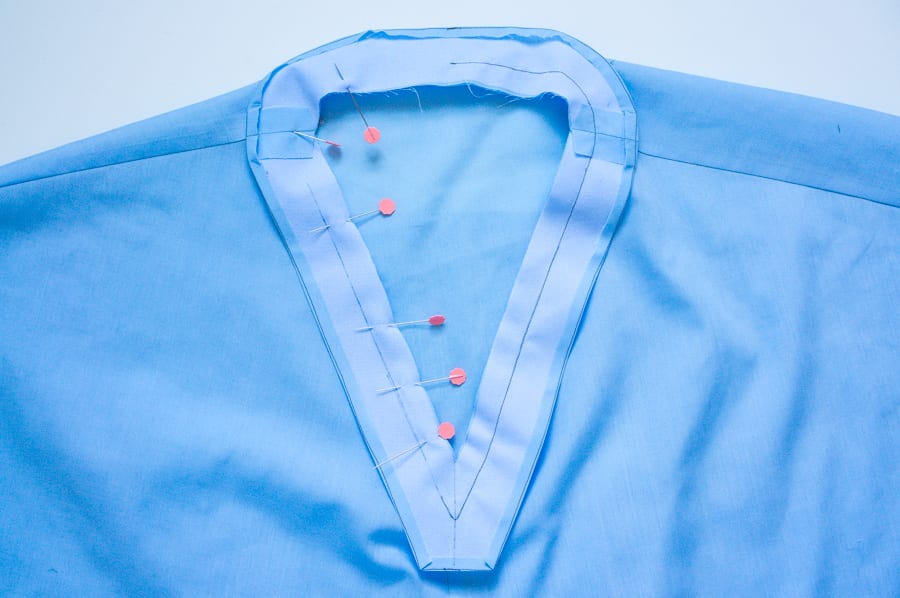
Прежде чем прикалывать обтачку к основной части изделия, я считаю полезным также нарисовать линию шва, как мы делали для лифа. Я также отмечаю середину переда, чтоб можно было идеально совместить ее с серединой переда лифа.
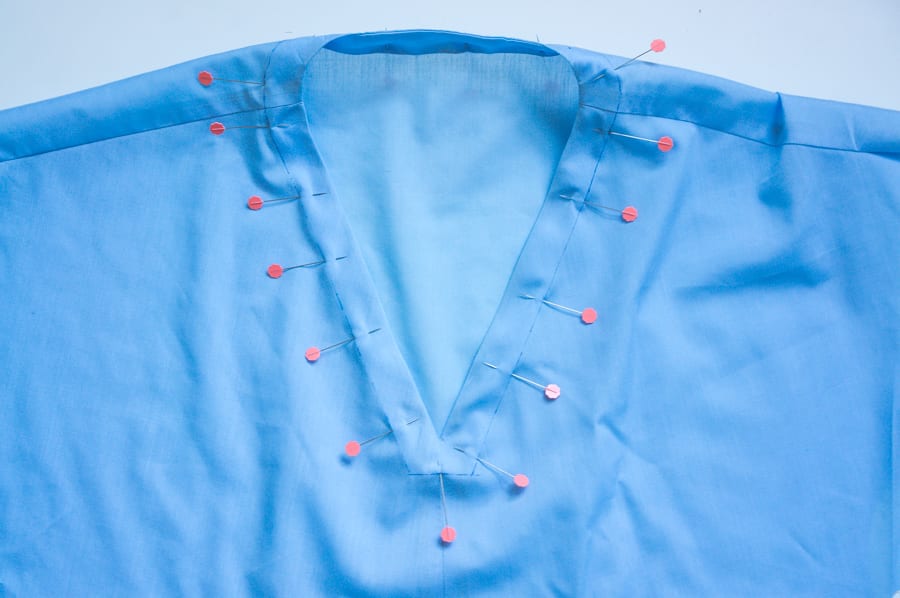
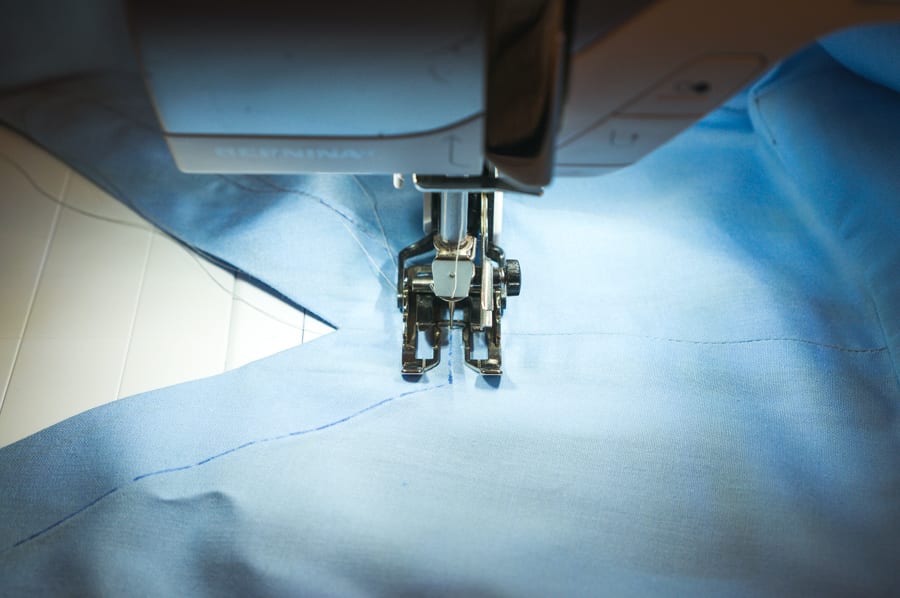
Соединяем лицом к лицу обтачку и лиф, скрепляем их булавками, совмещая плечевые швы и точку V. Здесь нам пригодятся нарисованные ранее линии.
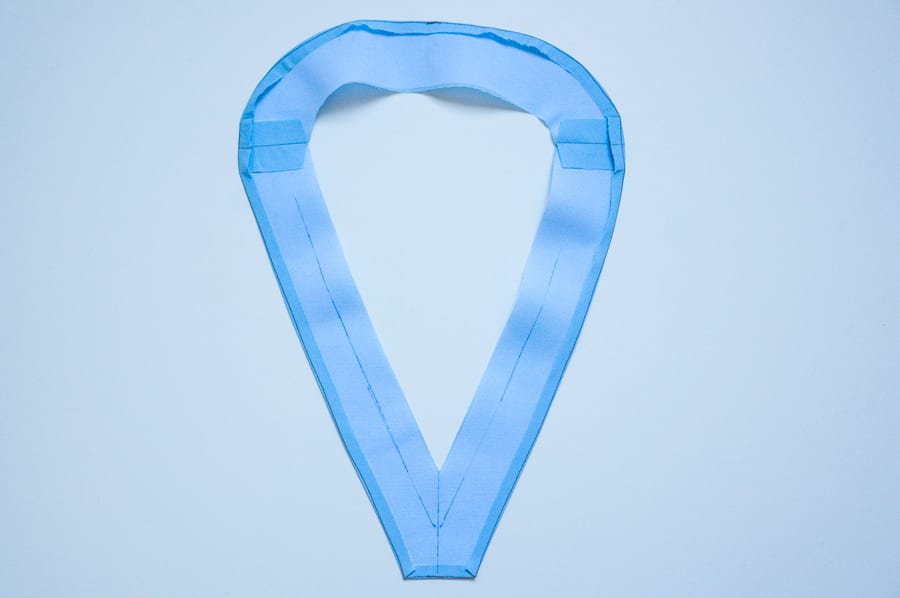
Сшиваем детали с припуском 1,5 см. Опять же, я рекомендую сшивать каждую сторону отдельно, аналогично тому, как мы делали для закрепительной строчки.Так как мы два раза проходим через точку V, это дополнительно укрепит эту область.
На фото ниже видно, что я прошила одну сторону выреза от середины переда до середины спинки. Повторяем для другой стороны.
Пришло время вывернуть изделие на лицевую сторону. Убедитесь, что обтачка пришита точно посередине горловины. Если она немного не по центру, легче исправить сейчас, прежде чем мы закрепим ее в точке V.
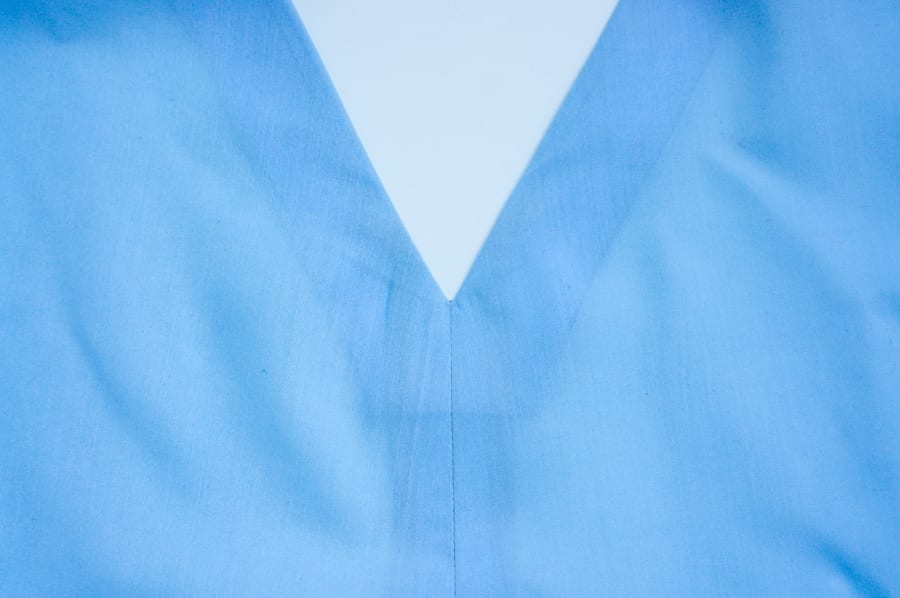
Острыми ножницами разрезаем внутренний угол точки V, не доходя до шва. Если кончики ваших ножниц тупые или если вы сделаете разрез не по центру, будет сложно сделать аккуратный и чистый вырез.
На фото ниже показано, как разрез должен выглядеть с изнаночной стороны. Мы прорезаем закрепляющий шов, но не прорезаем шов, соединяющий обтачку и лиф вместе.
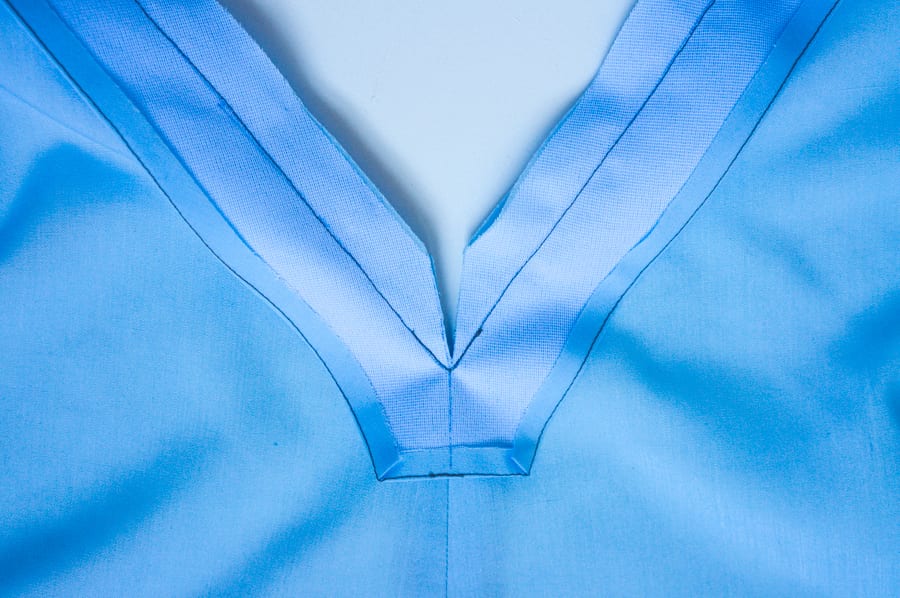
Подгибаем обтачку внутрь изделия и хорошенько приутюживаем. Мне нравится использовать портновскую гладильную подушку для утюжки этой части изделия. Можно сейчас подровнять припуск на шов, чтоб уменьшить толщину подгибки.
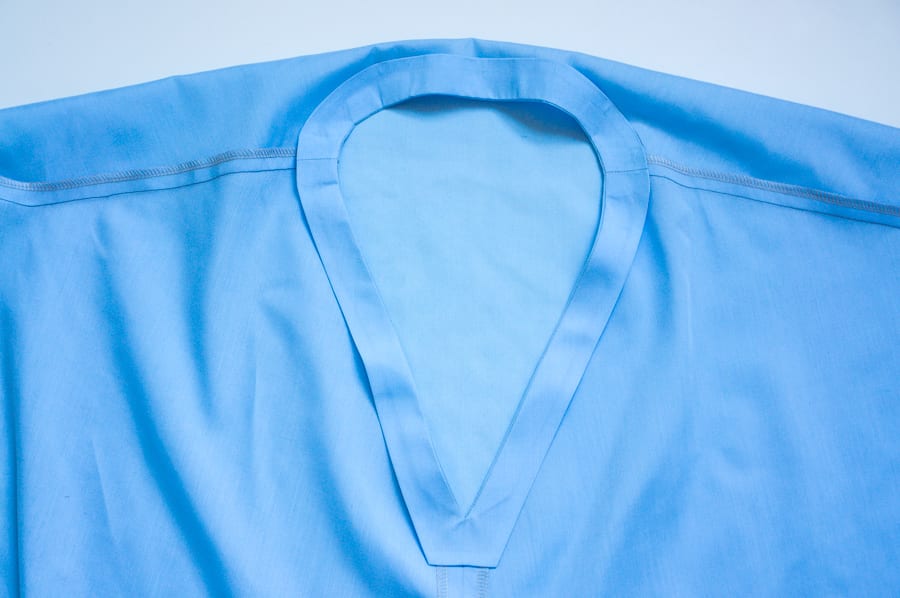
Если вы аккуратно все выполнили, у вас должен получиться чистый V-образный вырез. Когда вы заутюживаете обтачку, убедитесь, что она не выступает с лицевой стороны изделия.
Последний шаг — пришить обтачку к изделию, чтобы она не сдвигалась и не выглядывала, когда вы будете носить вещь. Можно закрепить обтачку булавками, а можно проклеить тканевым клеем-карандашом по краю обтачки вместо булавок.
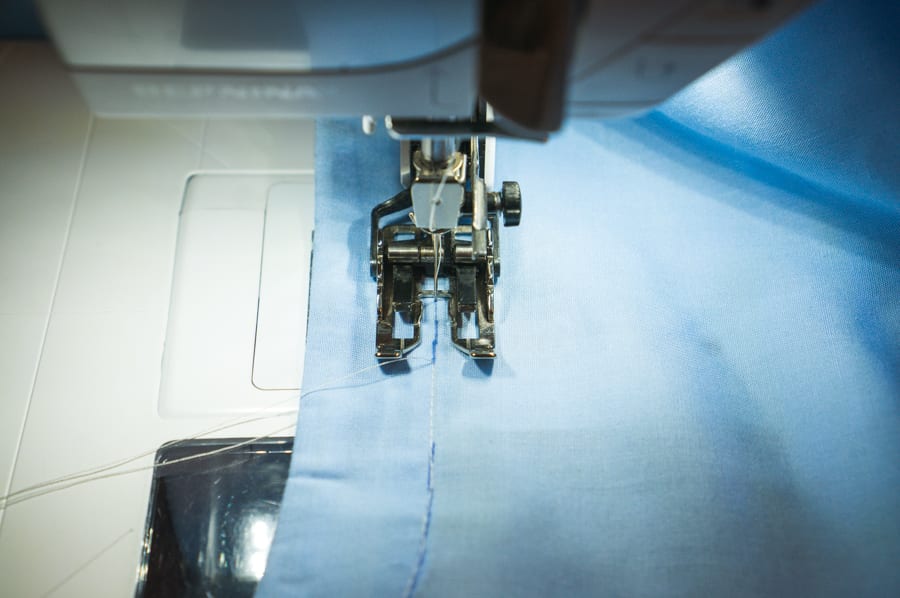
Для того, чтоб проложить ровную строчку по обеим сторонам V-образного выреза и вдоль воротниковой зоны на спинке, я тоже обычно рисую линию шва исчезающей ручкой. Нам нужно, чтоб шов проходил на расстоянии 2,5 см от края, и нанесение линии поможет избежать любых отклонений на этом этапе. Вы также можете наметать вручную , если беспокоитесь по поводу использования ручки для маркировки на лицевой стороне изделия.
При стачивании деталей обтачки и лифа ткань может сместиться, вызывая морщины. Проклеивание деталей или переход на шагающую лапку может помочь равномерно подавать слои ткани во время шитья.
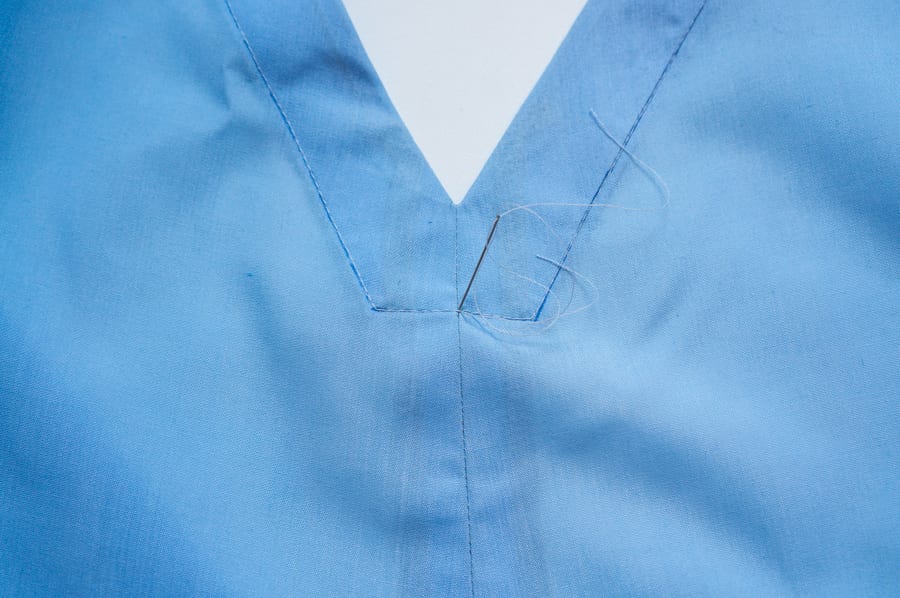
Вы можете шить непрерывно за один раз или, если вы хотите быть особенно осторожными и не деформировать вырез горловины, можете сшить две стороны V-образного выреза отдельно, как раньше. Используйте маховик, чтобы опустить иглу на направляющую линию, которую вы начертили, точно по центру переда, и шейте вдоль этой линии, пока не дойдете до центра спинки. Когда вы начинаете и заканчиваете шитье, оставляйте длинные концы ниток без обратных стежков. Затем, когда вы будете шить вторую сторону, опустите иглу точно в то место, где вы начали первую строчку и продолжайте до того места на середине спинки, чтоб строчки встретились.
Воспользуйтесь ручной швейной иглой, чтобы вытянуть концы ниток на изнаночную сторону спереди и сзади, на спинке, и свяжите их узелком.
Когда закончите шить, хорошенько проутюжьте вырез. Если шов немного волнистый, на этом этапе можно это исправить, используя отпариватель или порновские утюжки из бука.
Вот и все, что касается V-образного выреза. Надеюсь, осень будет теплой и мы еще сможем надеть легкие вещи.
Наша команда Мастеров Рукоделия постарается радовать вас новыми интересными уроками!
Спасибо за внимание и до новых встреч!